Showing posts with label propagating. Show all posts

Saturday, 15 May 2010

Thursdays favourite plant

(I know, its Saturday)

Lilac Syringa
image via flickr

I'd love one of these in my garden, but alas I have no room for one, instead I've been enjoying my neighbours tree. He's gone away for a week and left me in charge of watering his greenhouse and hanging baskets, this have given me a perfect opportunity to wander round his beautiful garden (he used to open for the ngs)and stand below his lilac tree and take deep breaths of its heavenly perfume. It over hangs his fence too so in the evening when I walk past it to go to the field to shut the chickens in for the night the scent is incredible.

Lilac trees have the most beautiful scent and the flowers are so pretty, tiny little star shaped blooms, grouped together in large panacles or cone like spikes that festoon the tree about now. There are different coloured varieties as well as the lilac lilac I love the white 'Madame lemoine', the dark pink 'red prince' and the beautiful 'sensation' which has purple flowers with a white edge to them.

I say lilac's a tree but its actually a shrub, my neighbour has grown his into a tree by allowing it to develop one main stem that has become a trunk. They grow to about 5/8 metres high so are well suited to smaller gardens. They like full sun and grow on most soil types but like it slightly on the alkaline side. Like all spring flowering plants they flower on last years wood so prune them after they've flowered. To increase the flowers and to keep the shape in check, prune out about a third of the branches each year after flowering. Or you can remove all the branch's at ground level bar one strong healthy one to encourage it to grow into a tree shape. Lilacs throw up suckers like no bodies business, and if you remove these carefully with some roots attached you can propagate lots more little plants. As most lilacs are grafted onto rootstock you might find the suckers are a different variety.

Jess xx

P.S thanks for all the wonky love, she really is a character and is loving being spoilt rotten, I even caught my husband sat with her on his lap feeding her corn from his hand.

Monday, 10 May 2010

Free plants (well sort of), softwood cuttings

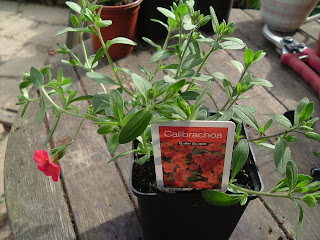
I love this time of year all the garden centres and nurseries are awash with bedding plants. This year I've toned down my bedding plant buying and have sown a lot of seeds and the plants I have bought have been from small local family run nurseries. I've decided to stop buying plants from big garden centres, I want to support the smaller places and not give my money to the big boys. So I'm avoiding the garden centres and stocking up at nurseries, gate side stalls and village fetes. I'm very lucky to have the amazing Hill house nursery close by and they sell the most amazing selection of everything all grown on site. Anyway I've veering of point.

So bedding plants, about now they would have put on a lot of growth, if you want really lush, full plants instead of long leggy thin plants, cutting them back with encourage lots of side shoots and lots of good growth. It may seem drastic to hack back your newly bought plants (especially if they have flowers on them) but trust me, you'll be glad you were brave in a months time when you hanging baskets look gorgeous.
Now this is the really cool part turning you little plant in lots of little plants.

Softwood cutting tutorial

Lots of people find propagating plants a bit of a mystery, something only old men in green houses do (I was always a bit daunted by it when I started gardening) but it's really easy.

So Here is a lovely little cherry red million bells, lots of nice growth perfect for taking cuttings from.

So you need to cut the plant near the side shoots (this will encourage the little side shoots to grow on the plant, giving you lots more flowers)

so this is what you have to work with.

Trim the bottom of the stem to just below the two side shoots, this is where there roots with grow from. Remove the leaves

Its a good idea to remove the top shoot, this will help the cutting put its energy into forming roots instead of top growth,

Then its a case of filling a pot with nice damp soft free draining compost (add some grit to prevent the compost getting waterlogged and the cuttings rotting) and making a little hole using a plant label of chopstick or knitting needle (something long and thin) and inserting your cutting, don't just push the cutting into the compost as its quite delicate and you can damage the base. I rarely use hormone rooting powder, but you can, it contains fungicide to help prevent the cutting rotting.

if you put the cuttings around the side of the pot they stand a better chance of the roots striking, as the roots hit the side of the pot they will branch out and grow stronger. Also you can fit quite a few in a pot and save on space. Try to avoid the cutting touching each other.

If you have a lot of large leaves on your cuttings (like with these mint cuttings) cut the leaves in half. This will cut down on water loss from the leaves (OK science bit coming up.... the cells in the leaves put a pressure on the roots to suck up water, respiration. buy reducing the surface area you reduce the force of the pressure.)

You need to keep your cuttings moist until the have formed roots (to check gently turn the pot upside down and you'll see little roots poking out the bottom) They need humidity to keep the leaves moist (look out more science.... the leaves in plants are surrounded by an invisible film of moisture, when this film is lost they put pressure on the roots to replace it and your little cuttings haven't any roots yet so it will be curtains for them) mine are in my little greenhouse or you could put a clear plastic bag over the pot kept secure with an elastic bag, make sure the cuttings don't touch it.

So heres my little collection which hopefully in a few weeks will be ready to be planted out.

I even used the mint leaves I removed on the cuttings to make a cup of tea
which was lovely except for the bits of compost floating about in it.

Jess x

Friday, 14 August 2009

Thursdays favourite plant


Scented geraniums

I currently have 2 of these fragrant delights but after browsing about on the interweb I've decided I want to start a collection (even though I have no room).
I have Attar of Roses and Prince of Orange which smell funnily enough like rose's and oranges.
There are so many different types ranging from mint to apricot. I've been told the Attar of roses has the best rose scent to it, I love picking of a leaf and giving it a scrunch. I use the leaves for drying and cooking, you can add the a couple of leaves when making rice pudding, ice cream, chessecake, pannacotta by infusing them in the milk/cream before mixing everything together. This is important: only use a scant few leaves as they can be quite overpowering.
I recently made some strawberry jam and added some leaves (rose) to the simmering juice and berries, taking them out before boiling. The jam has a very delicate hint of rose about it yum.

Scented geraniums are tender short lived perennials. They need protection over winter, I bring mine inside and put them on the window ledges. If I had a conservatory or greenhouse ohh I could fill it with them. They also are great plants to take cuttings from either mid spring or late summer. I nearly killed my Attar of roses earlier this year by putting it outside on a nice sunny day in march but forgetting to bring it back in that night . It got frosted and went black and looked awful, two days before I'd cut it back (to encourage healthy new growth) and luckily I'd stuck some of the stems I'd cut in a jar of water. So I potted these up and now have two lovely bushy plants and a smaller tied looking mother plant (never quite recovered.

Next spring when I go to Hill house nursery next spring I stock up on a few more (ssssh don't tell the husband).
 

blogger templates | Make Money Online